April 01, 2009
Welcome to the first edition of the Digital Photography Tricks Newsletter. On behalf of Lindsay and myself, I would like to thank you for supporting this newsletter and the Digital Photography Tricks website.
If you have something related to photography that you would like to share with our readers, then drop us a line at newsletter@digital-photography-tricks.com. We will publish it in future issues of the newsletter and add your name or website link to it.
What’s Happening In This Issue
If achieving better photography results is about anything, it’s all about creativity. Most people can learn how to use a DSLR and work out their aperture and shutter speed, but you also need that creative flare.That flash of inspiration you need to make your photographs really stand out from the rest.
It’s hard to teach creativity, but there's a lot you can learn by watching other top photographers. That’s what I’m trying to achieve with this website and newsletter.
I hope you get lots of ideas and inspiration from reading them. Also, I’d love to hear from you about how you’ve put some of these tips, techniques and tutorials into action. There’s plenty of opportunities for you to get involved.
Send me your top tips, your favourite pictures and as much feedback as possible to help improve and make this site the greatest photography website on the internet.
What’s new this month at Digital Photography Tricks?
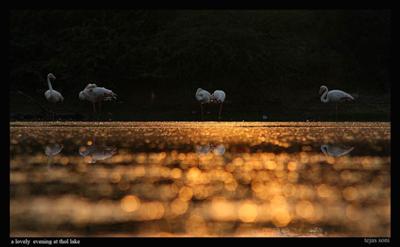
- Golden Evening With Flamingos
- Digital Portrait Photography - Capture Your Subject's True Personality (Updated)
- Standard Three Light Setup - Key, Fill and Separation
- Camera Bag – Top Tips For Buying One
- The Humble Shower Cap
- Be My Baby!
- What Is A Camera Sensor?
- What Causes Dark Corners?
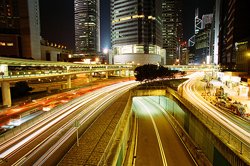
- Tip 1 – Trails Of Light.
Portrait and Candid Photography: Photo Workshop by Erin Manning
Photo Of The Month
Golden Evening With Flamingos by Tejas Soni
Lets Get Started
NEW THIS MONTHGolden Evening With Flamingos
I was trying to get some shots of the Marsh Harriers at Thol Lake, Mehsana, Gujarat. There were about 7 or 8 of them flying about. Added recently at YOUR Pictures
Digital Portrait Photography - Capture Your Subject's True Personality
Digital portrait photography or taking pictures of people sounds like an easy task, but a certain approach is required to make sure you do your subjects justice.
Standard Three Light Setup - Key, Fill and Separation
A typical three light setup consists of a Key light, a Fill light and a Separation or Back light. This setup allows the photographer full control over the illumination of the subject.
Camera Bag – Top Tips For Buying One
By investing in a good quality camera bag you can make sure your valuable photography gear is sheltered from costly damage. Learn everything you need to know here.
READERS TOP TIPS
Have you any tips that you’d like to share with your fellow readers and photographers? Then get in touch, we really want to hear from you. Drop us a line at any time to newsletter@digital-photography-tricks.com
The Humble Shower Cap by Bill Henderson
Whenever I stay in hotels, I always grab those handy little shower caps they give away complimentary in the bathrooms. They make great, almost waterproof protection for cameras and lenses when they are packed in rucksacks or shoulder bags.
Be My Baby by Jenny Mills
This is a great tip for photographing babies and children. When working with babies, allow the baby or child to touch the camera. They’re naturally curious and if you let them touch the camera, they’ll soon get bored of it and forget it’s there.
TOO SHY TO ASK...
Is there something about photography you think you should understand, but don’t really? Don’t be too shy to ask, I can help. Send your questions to newsletter@digital-photography-tricks.com. If I can’t answer them, one of our readers should definitely be able to.
What is a ‘Camera Sensor’?
The camera sensor is a light-sensitive electronic chip that’s used to record the image taken by a digital camera.
So fundamentally, instead of using photographic film behind the camera shutter, there’s an electronic sensor. There are two main sensor types – Charged Coupled Device (CCD) and Complementary Metal Oxide Semiconductor (CMOS).
The bigger the sensor, the better, as they usually have more light sensitive pixels. Imagine a pixel as a bucket, collecting light rather than water. A deeper bucket with a larger opening can collect more light in a shorter space of time, therefore staying more sensitive to changing light conditions. Larger sensors with more pixels also generate less electronic image interference or noise.
What Causes Dark Corners?
A question emailed in by a reader states, ‘In some of my photographs, taken at the most wide-angled end of my lens’s zoom range, the corners of the image are noticeably darker than the rest of the picture’. What causes this? Is there an easy way to fix it?
This darkening effect at the corners is known as vignetting. It’s a common problem when shooting with wide-angle lenses. It happens when a large aperture is used.
One way to reduce the effect is to avoid taking wide-angle shots at the lens’s largest aperture setting. For example, if its maximum aperture is f/4 at the wide-angle end of its full zoom range, try reducing it to f/8. If you’re using a screw-in filter, try removing it.
5 EASY WAYS TO MASTER DSLR CREATIVITY
Are you ready to leave behind the auto mode and get more creative with your camera? Your DSLR is perfectly capable of taking high-quality pictures of any subject you shoot at – and it can usually deliver totally acceptable results on the ‘auto’ mode.
The thing is...if you want to shoot pictures that will make other people envious, or challenge their outlook of the world, you’ll need to plunge beyond your point-and-click comfort zone.
But don’t worry, it’s easy and fun. Over the next few issues of this newsletter, you’ll find five great creative effects for every DSLR owner to try. Some are really simple, while others need a bit more thought and practise. But all will definitely make your shots really stand out from the crowd.

Tip 1 – Trails Of Light
Roads and bustling traffic normally ruin your compositions in daylight. But when the sun goes down, the dark tarmac merges into the night and moving cars can be made to disappear from sight with exposures measured in whole seconds. You’ll be left with beautiful streaks of light created by headlamps and tail lights as they move through your scene.
I use a canon 400d DSLR, so I am going to explain how to achieve a light trail with this, but it should be pretty easy to replicate on any DSLR.
For a normal downtown street using an exposure of 20 secends is usually long enough. To achieve this, set the ISO to 100 and use a narrow aperture (around f/22). Better results are often achieved when shooting in the Tv (Time Value) mode or shutter priority.
In the country or on a large stretch of road you need a longer exposure. Use the manual mode and set the shutter speed to bulb, so that the shutter stays open as long as the trigger is pressed. You might need an exposure of 1-2 minutes.
For this effect the static parts of the scene need to be pin sharp, despite a multi-second exposure. A solid tripod is a must. A cable release is also invaluable, particularly if you are using the ‘bulb’ setting to get exposures over 30 secs long.
Next month learn about ‘Blurring Waterfalls’
PHOTOGRAPHY BOOK OF THE MONTH
Have you heard of the book, Portrait and Candid Photography: Photo Workshop by Erin Manning. It has step-by-step lessons that show you each technique from start to finish. It’s ideal for an amateur wanting to get started in this area of photography.
Erin says that the secret to taking great "people pictures" is to observe your subjects, connect with them, and use your camera to its best advantage.
The book will teach you how to work with lighting, location, angle, composition, physical characteristics, environment, and countless other variables, including the unique challenges of photographing babies, group activities, and action. Learn to capture facial expressions, tell a story with a series of candids, add interest to large-group shots, and more. Apply these techniques and watch your subjects come to life.
What other people thought:
Ms. Manning's book is a "must have" book. It is a great overview of photography techniques and has fresh ideas on how to approach the subject. I especially liked the chapters on kids and babies. Erin Manning has a special gift that she shares with the reader. My photography has greatly improved since reading her book. By Patricia Hunter
PHOTO OF THE MONTH
If you have a photograph that you are particularly proud of and you want to share it with the rest of our readers, then why not post it at YOUR Pictures. Don’t forget to tell us a bit about yourself and what inspired you to take the shot.
You can also comment on other pictures that people have shared and rate them. The best ones each month will make it on to the front page of Digital Photography Tricks and be displayed in this newsletter as well.
The photo of the month for April is ‘Golden Evening With Flamingos’ by Tejas Soni

TELL A FRIEND
If you like this newsletter, please tell your friends. Share Digital Photography Tricks and this newsletter with as many of your friends as you wish. If they like photography, they should love this. Help them improve their pictures!
If you know of someone who would be interested in receiving this newsletter, please forward this email onto them, and ask them to click here, or send them this link:
https://www.digital-photography-tricks.com/digital-photography-magazine.html