 |
The Best Landscape Photography Tips And Techniques For Shooting Better Scenic Photos With Your Camera To WOW Your Friends
|
|
Professional landscape photography tips, tutorials and techniques will help you improve your scenic photography and allow you to shoot stunning panoramic pictures, with any digital camera, that are full of realism.
Learn composition techniques for framing and capturing better landscapes using the rule of thirds. Why it's important to have an interesting foreground and background. How to keep eveything in focus using a large depth of field.
Also learn about outdoor lighting tips and tricks when shooting scenery. What to do if the sky is too bright. When is the golden hour and why it's the best time to shoot a landscape photo. Adjusting your camera settings and spot metering to find the correct shutter speed for best overall exposure.
 |
Are YOU Fed Up With Your Disappointing Landscape Photos?You don't need a fancy DSLR camera to capture stunning landscape shots. Scenic photography is all about composition and lighting and Amy Renfrey shares her landscape photography tips in this easy to understand eBook for beginner photographers. Click Here To Find Out More* |
Getting beautiful, colorful and well composed shots of your favorite seascape, vista or panorama is not an easy task. There are some basic camera skills that you need to master along with these landscape photography tips if you want to capture impressive views.
To get really professional and creative looking landscape pictures, you need to know how to take full control of your camera by following this easy-to-understand photography guide for help and advice. You'll also need to know what other pieces of camera kit you need such as lenses, filters, image editing equipment, etc and when and how to use them.
There are many simple factors that can hinder your plans for creating a perfect or great landscape shot. For instance, your aperture could be too wide producing the incorrect, shallow depth of field, making your photo blurred in the distance.
Also, the horizon in your shot could be slanted because your camera is slightly off level. The sky might end up too bright and over-exposed compared to the rest of your scenery. Using a graduated filter can fix this.
But, don't worry... Use these landscape photography tips and techniques and you'll achieve the professional and impressive scenery shots that you desire. If you have any goods tricks you use yourself, drop us a line and tell us about them.
 |
| Photo by Patrick Smith |
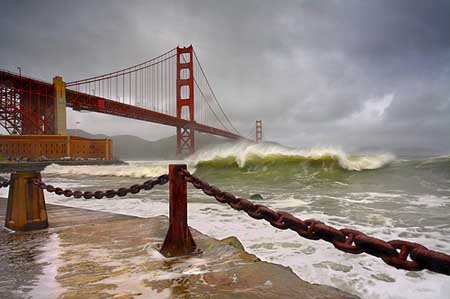
This seascape picture was taken around February 2008 at the Golden Gate Bridge in San Francisco. He used a Canon 5D MkII with a L series 17-40mm lens. It was taken with a focal length of 24mm, ISO 50, F22 and 1/10 second exposure. He also used a Lee soft ND (Natural Density) grad 0.9 filter with a Cokin z-pro holder and shot in RAW. This is not HDR.
Landscape Photography Tips
What Camera Kit Do You Need?
Some of the basic photography equipment that you'll need for shooting
landscape photographs with a DSLR camera is:
- A Sturdy Tripod
- ND Grad Filters (Natural Density Graduated)
- Polarising Filters
- A Hotshoe Spirit Level
- Cable Release or Wireless Shutter Release
If your tripod has a built-in spirit level, you won't need the hotshoe spirit level. The more expensive tripods also have a ball at the top which makes it easier to get your camera lined up and the shot composed.
If you don't have a cable release or wireless shutter release, you can use the camera's self-timer instead. I find it works just as well.
The filter's (polarising and graduated) are useful for making sure you have the right exposure for your shots. There are many to choose from depending on the landscape picture or scene you are shooting.
There are UV filters, Polarizing filters, Natural Density Graduated filters and even colored ones for making the sky look more blue or getting a beautiful orange glow during a sunrise or sunset.
 |
| Photo by Patrick Smith |
Landscape Photography Tips
Setting Up Your Camera
Aperture Priority
Set your camera to Aperture Priority (Av) mode. This allows you to choose the aperture settings for your shot and the camera chooses the shutter speed which best suits the lighting to gain the correct exposure.You may have to tweak it slightly using the exposure compensation control if the scene is over-exposed (too light) or under-exposed (too dark) in areas. If in doubt, it is always better to go slightly under exposed than over exposed. Alternatively, if you are comfortable with the camera settings, use manual mode.
For good landscape shots that are focused from the foreground through to the background, you need to maximise the depth of field. Choose a narrow aperture to make sure that the whole scene is in focus throughout the picture. Around f/16 to f/22 is a good place to start if there is a large distance between the foreground and background of your scene.
The size of the aperture for this depth of field will depend on the sensor size of your camera. If you are using a full framed sensor digital SLR camera such as the Canon 5d, you would go for f/22. If you are using a camera with a smaller sensor such as the Canon 400d, then use f/16 to start.
If the distance isn't that great, then you may be able to use a bigger aperture and still maintain focus throughout the scene. The sweet spot in most lenses is usually around f/8.
Don't forget that as the aperture gets smaller, the amount of light entering the camera's image sensor is less also. You may need to adjust your ISO (moving it higher) or lengthen the shutter speed to compensate for this.
Landscape Photography Tips For Adding Color Quality
Change the picture style in the menu, if your camera has this facility, to landscape.This is great for boosting color saturation, particularly the greens and blues and produces vivid picture quality. It also sharpens the image slightly making it look crisper.
Mirror Lockup and Tripod
To reduce camera shake and retain sharp focus, it's best to use mirror lockup and a cable release, wireless shutter release or self-timer.This allows the mirror to move up and out of the way earlier than normal so that any vibration it causes has stopped before the shutter opens. Every little helps when trying the keep the camera as still as possible. This landscape photography tip is only useful if used with the tripod.
As you’re using the tripod, there is no need for increasing the ISO. Use your camera’s lowest ISO setting, usually 100, to get the best quality images.
White Balance
You also need to check the white balance setting. I usually leave it on auto as most of the time it works OK. You might want to change it depending on the shooting conditions, setting it to cloudy or sunny.Shoot RAW
Shoot in RAW. This is one of the most useful landscape photography tips as it allows you to change and perfect your landscape images post-capture by keeping your editing options open.Don't Loose Focus
The last thing you need to do is set your auto-focus point according to your scene.I usually set mine to focus about one third of the way into the shot, especially if I have a foreground interest that I want to keep sharp while drawing the eye into the picture. As the background is farther away, it is less likely to be noticed if the focus isn't 100%.
 |
| Photo by Patrick Smith |
7 Top Landscape
Photography Tips, Techniques
And Quick Lessons To Learn
Get up early - The best lighting for
landscape photography is early in the morning (dawn) or late in the
afternoon (dusk). These are known as the 'Golden' hours. The scenery
looks really colorful and alive filled with interesting textures,
patterns and dimensions. Strong overhead sunshine during the day makes scenery look flat and not very attractive. When the sun is lower in the sky, you get greater lighting impact and useful longer shadows.
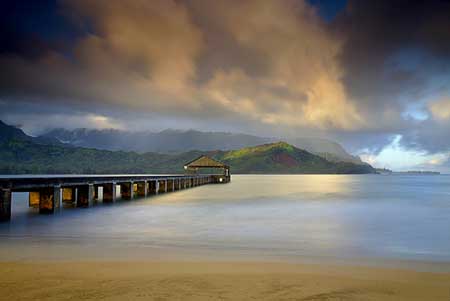
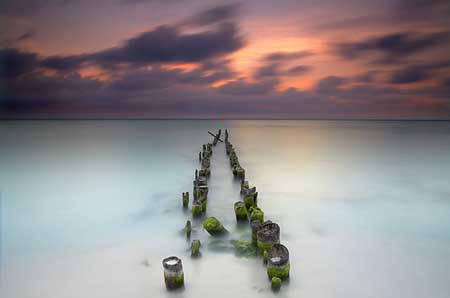
You can see that the picture below was taken late in the day as the sun was setting. It has created a beautiful warm effect on the Sky, while the Sea looks icy blue. The old pier draws the eye perfectly into the center of the picture.
Look for interesting sky - Plain blue sky can be a bit boring and uniform in your landscape shots. Add some drama and mix it up a little with fat, fluffy white clouds or dark gray storm brewers.
A good landscape photography tip is to look for some detail in the sky and using the rule of thirds bring the horizon done towards the center of your scene. Alternatively, if the sky is dull looking, keep it in the top third of your shot and look for an interesting foreground object to make the landscape look more interesting.
Also landscape photography tip is to consider using the Polarizing filter to enhance and add contrast and color to bland skies.
Add some color - Vivid colors look great in your scenery shots. Greens and Blues are really accentuated and clear. After you take your shot, lightly boost the saturation in the RAW editor and add a little extra sharpness to produce a nice crisp photograph.
Check white balance - Some large amounts of color, particularly green or blue, in a scene can be mis-interpreted by the camera's auto white balance setting. Change your camera's white balance to manual and choose a setting that most closely matches the weather conditions that day. E.g. Sunny, Cloudy.
Use the filters - A graduated filter or polalizer filter will allow you to get better exposure from your shots with the sky in them. In the early morning or late in the evening, the sky will be brighter than the scenery and could end up over-exposed.
A polarising filter will make your skies have a deeper blue and the clouds more accented. It will also help you to reduce reflections from areas of water such as lakes or ponds.
Composition - Use the rule of thirds. The most useful landscape photography tip is to break your scene up into thirds, both vertically and horizontally. Where these imaginary lines intersect, place your most interesting parts of your shot.
Look at how the horizon is positioned in the picture below. Right on the line between the top and middle thirds of the image.
Some foreground interest - Large open landscapes always look a little bare in places. Try to add a little foreground interest when your shooting to draw the viewer's eye into the scene and also to give it a sense of perspective and scale. Something like a rock or park bench is good or even an old pier like Patrick used.
 |
| Photo by Patrick Smith |
Best Books From Amazon.com
About Landscape Photography
Return from Landscape Photography Tips to Digital Photography Tips
Return from Landscape Photography Tips to Digital Photography Tricks
| Didn't find what you're looking for? Search here... |

Custom Search
|


